General information
The Poster session for TQC 2021 will be held using the remote conferencing platform Remo, which mimics an in-person event. Each poster will be assigned a “table” (i.e., a group video chat room with a virtual whiteboard) where presenters will upload their poster in the PDF format. The participants will be able to interact with poster presenters using text chat, video call or the whiteboard. Participants of the discussion can also share their screen to help the discussion. The distribution of posters across the “buildings” and “floors” (see Poster session schedule/floors) is available online.
The Poster session will be purely browser-based. Up-to-date versions of Firefox, Chrome, Edge and Safari on Windows or Mac are supported; other combinations of browsers / operating systems may not work. In particular, the Poster session cannot be attended using a mobile device (the Whiteboard and/or screen sharing is not supported by Remo on mobile devices). Visit https://geartest.remo.co to verify that your system satisfies the requirements (even though Linux is not officially supported by Remo, you may find it possible to use the Remo platform on Linux systems anyway). To use the video-chat feature, you must grant your browser access to your microphone and camera.
Below are detailed instructions on how to access and use the TQC 2021 Poster session.
During the Poster session
Poster session schedule/floors
The event can only be accessed during the scheduled sessions (on Tuesday, July 6th, and on Wednesday, July 7th). To access the event, follow the “Log in” instructions below. During each session the posters will be divided across two different Remo “buildings” (on Tuesday these buildings will be labelled “A” and “B”, on Wednesday “C” and “D”. If only a single building is necessary on either day, then only “A” or “C” will be present, respectively). In each building, there are five “floors”. On the first floor, the Help Desk is located; here you can talk to the organizers and their staff. The remaining “tables” serve as a testing place and the landing area for the users joining the event for the first time.
The remaining floors are designated for poster presentations. Each of those floors has nine tables designated for poster presentations and labelled accordingly (e.g., A3P024 for poster #024, which will be situated on the 3rd floor of the building “A”). At most eight people at a time (seven visitors and one presenter) can be at one table. In addition, a few unnamed tables will be available on each floor, which can be used for private (video-) conversations between participants.
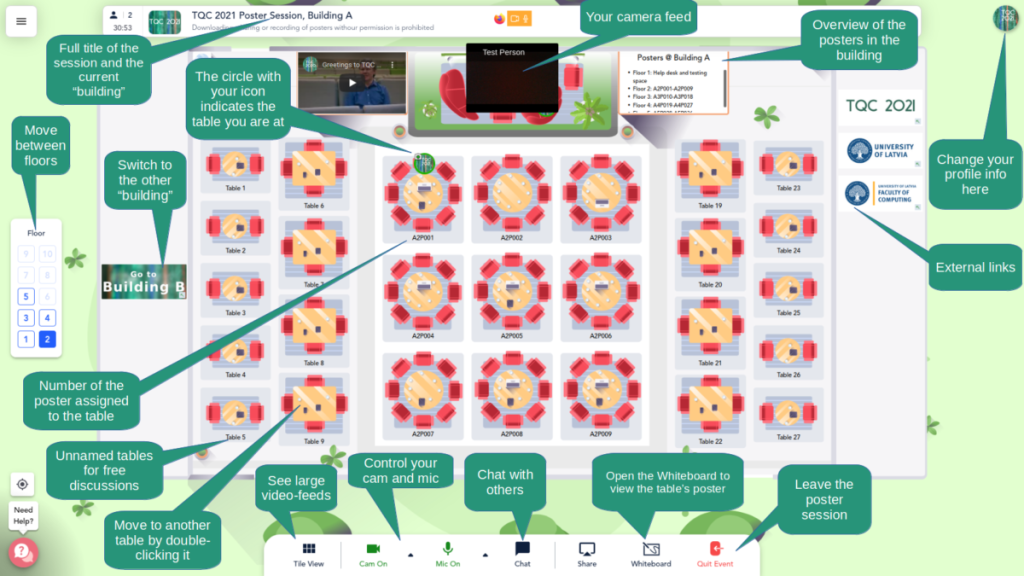
Floors can be changed using the elevator-like panel on the left (see Figure 1); you can switch between the buildings using the button indicated in Figure 1.
Log in to the Poster session
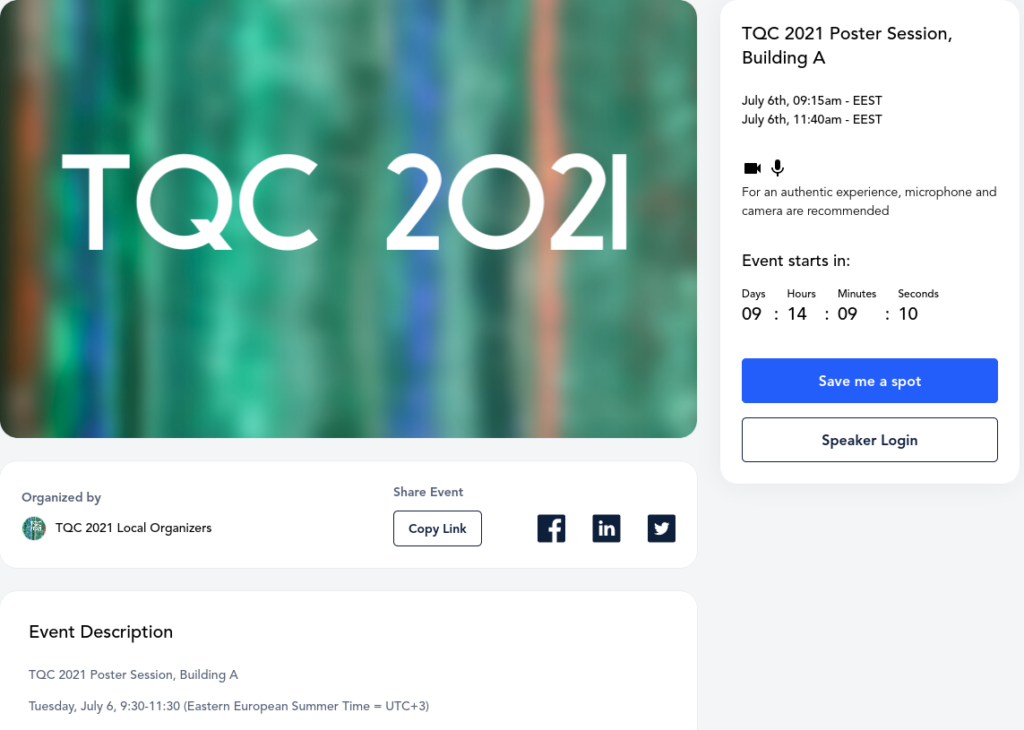
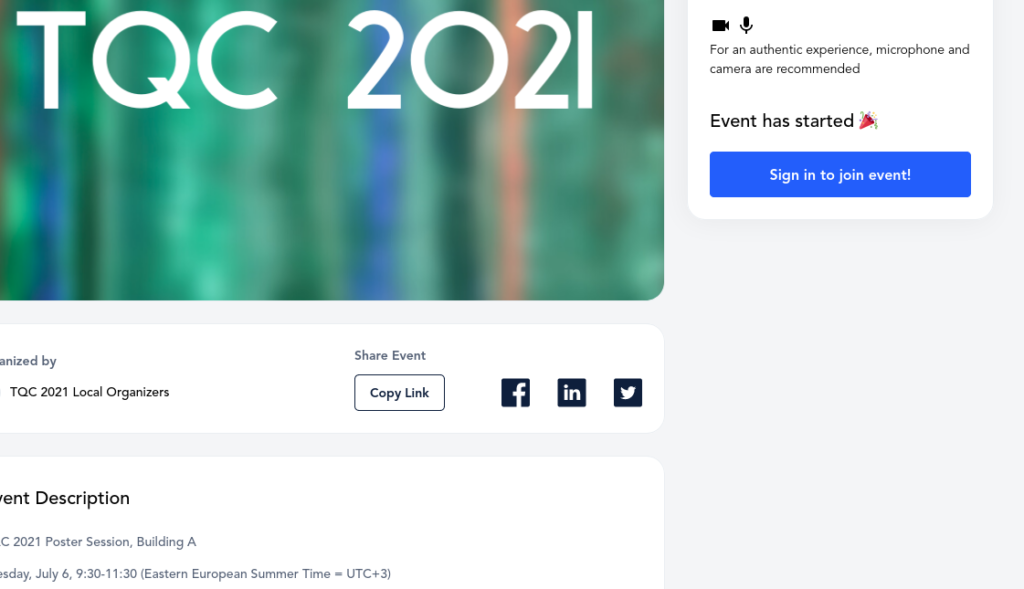
Use the link to the appropriate building to access the event landing page, and click “Save me a spot” (Figure 2) if the event has not started yet. If the event is already running, click either “Sign in to join event” (Figure 3) or, in case you are already logged in, “Join Event Now” on the event welcome page.
Links to the Buildings:
Building A
Building B
Building C
Building D
Log in to your account if you are already registered for Remo, or enter your email address to register for Remo. After joining the Poster session, you will be “seated” at a random “table” (typically on the first floor unless it is already full). Then you can
- move to another building using the buttons indicated in Figure 1;
- move to another floor using the elevator-like panel (on the left in Figure 1);
- move to a new table by double-clicking it (provided there is a free seat at that table).
Find a particular poster
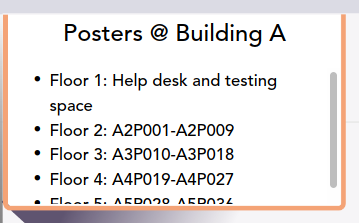
Each poster will be presented at its own designated table, named accordingly; the name indicates the building and floor, and the table is identified by the poster’s number (e.g., A3P024 for poster #024, which will be situated on the 3rd floor of the building “A”). The table name for each poster will be posted on TQC website. The right billboard also indicates the available posters in the buildings, see Figure 1 and Figure 4.
To visit a particular poster, navigate to the respective building and floor; when you have found the designated table, double click on the table to be seated at it (provided that there is a free spot left at the table). You should see your icon (showing your photo or first initial) displayed at your table, see “The circle with your icon indicates the table you are at” in Figure 1. To check out the poster, click the “Whiteboard” button in the main toolbar (alternatively, the presenter may decide to present their poster via screen sharing instead of the Whiteboard).
NB! When joining a table, ensure your microphone is muted. Unmute yourself to ask questions, but remember to turn the microphone back off when you are not speaking. We suggest that you leave your camera on when participating the Poster session. Notice that Remo allows guests to annotate and change the contents of the Whiteboard; please use this option only with presenter’s permission. The Poster session will be moderated for disruptive behavior. Please do ask presenter’s permission before downloading, sharing or recording the poster.
Once you open the Whiteboard, the poster in all likelihood will have extremely low resolution at first. Please allow a few minutes for the PDF to load and be displayed correctly. If the issue persists even after 10 minutes, please contact TQC staff (either at the HelpDesk on the first floor in “A” or “C” buildings or by sending us an email).
Interacting with others

You can turn on your camera and microphone in the main toolbar (Figure 5). Notice that you can only talk to the people that are seated at the same table as you. Click on “Tile view” (or double-click on somebody’s video) to have large-size video feeds (or enlarge the shared screen if somebody has activated the “Share” button), and switch back to the map view by clicking on “Back to Floor” in the main toolbar. You can also use the chat function from the main toolbar to send a message
- to all the participants present in the room,
- to all the people at your table,
- to a particular participant.
A few final tips
- Test in advance. Test your browser, camera and microphone on https://geartest.remo.co before the actual Poster session.
- Close unnecessary apps. This may improve the quality of your audio and video feed.
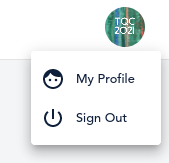
- Personalize your profile. Add a profile picture if you did not do that during the Remo registration process. The profile can be edited using the circle icon in the top right corner (Figure 6). Fill in your profile information; note that “Headline” is the text that will appear when people click on your icon.
Leaving
When the session ends, exit the Poster session by clicking the “Quit Event” button in the main toolbar.